
A floor plan is a scaled, two-dimensional drawing that shows a building's layout as a horizontal slice taken roughly 4 feet above floor level. Everything above that cut, like ceiling fans and upper cabinets, disappears from view. What remains is a precise map of walls, doors, windows, and fixed installations, drawn to scale so every line represents a real distance. For homebuyers, learning to read floor plans is the difference between guessing how a home will feel and actually knowing.
How to read floor plans: the foundational elements
Before you analyze a single room, orient yourself with four items printed on every competent plan.
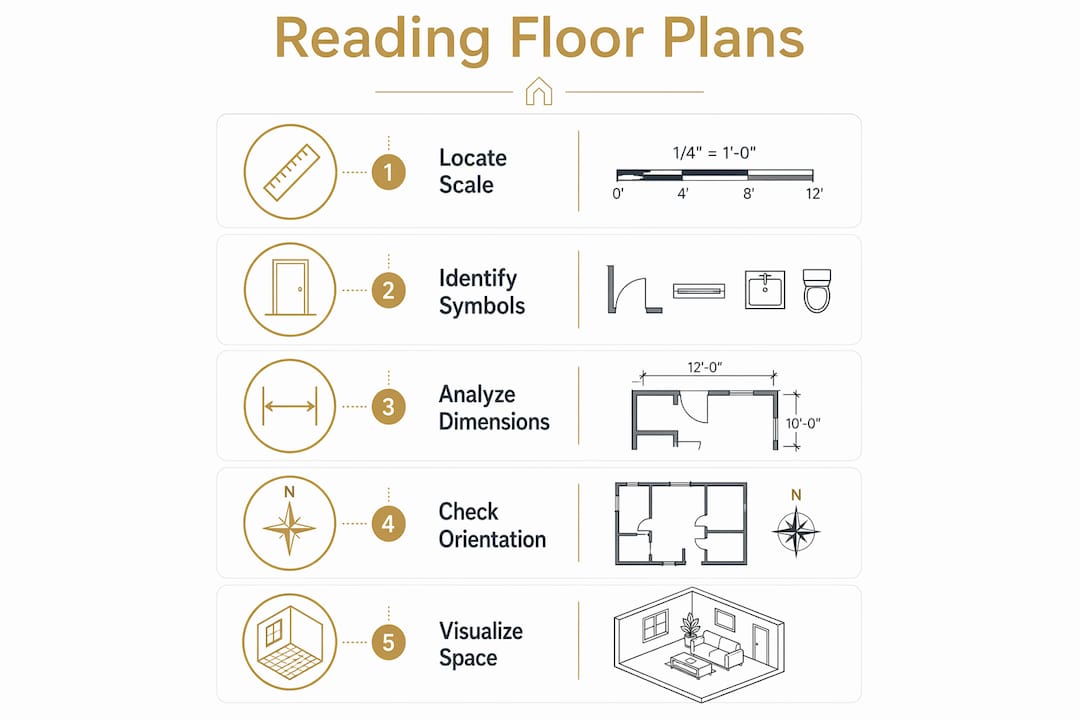
- Scale: Usually expressed as 1/4" = 1' or 1:50/1:100 metric, the scale tells you how distances on paper translate to real-world dimensions.
- North arrow: Shows which walls face morning sun, afternoon heat, and prevailing breeze.
- Legend: Decodes every symbol and abbreviation used on the drawing.
- Title block: Names the project, drawing date, and revision number. Always check the revision before spending an hour on a plan that has been superseded.
A floor plan is the primary tool to translate property math, like square footage and room counts, into functional spatial understanding. Without it, you are buying a number, not a home.
Walls appear as parallel lines, with thickness signaling their role. Doors show as thin rectangles with an arc indicating swing direction. Windows appear as breaks in walls with fine lines crossing the gap to represent glass and frame. Room labels identify each space by function, often paired with dimensions.
Common abbreviations to know:
- WIC = Walk-in closet
- AFF = Above finished floor
- O.C. = On center
- R.O. = Rough opening
- TYP = Typical condition
Common symbols and features on residential floor plans
Knowing what each symbol represents lets you decode any plan quickly. The table below covers the most frequently encountered elements.
| Symbol | What it represents |
|---|---|
| Thick solid lines | Exterior or load-bearing walls |
| Thin solid lines | Interior partition walls |
| Arc from wall edge | Hinged door with swing direction shown |
| Dashed line in wall | Pocket door sliding into wall cavity |
| Break in wall with fine lines | Window (glass and frame) |
| Rectangle with circle | Sink or toilet fixture |
| Dashed lines above room | Elements above the cut plane (upper cabinets, ceiling beams) |
Load-bearing walls are drawn with noticeably thicker, solid lines compared to partition walls. That distinction matters most when you are thinking about renovation potential. Removing a partition wall is straightforward; touching a load-bearing wall requires structural engineering.
Door swings deserve special attention. The arc drawn on the plan represents the actual floor area the door sweeps when opened. Ignoring door swings is one of the most common planning errors, leading to furniture layouts that simply do not work in practice.
Kitchen and bathroom fixtures, including sinks, toilets, ranges, and refrigerators, are drawn to scale and positioned deliberately. A refrigerator placed too far from the sink creates an awkward work triangle. A toilet set too close to a vanity makes the bathroom uncomfortable to use. These placements are intentional design decisions, not arbitrary.
How to understand measurements, scales, and room dimensions
Scale is the mathematical relationship between the drawing and the actual building. At 1/4" = 1', every quarter inch on paper equals one foot in reality. A wall measuring 3 inches on the plan is 12 feet long on site.
| Scale notation | System | What it means |
|---|---|---|
| 1/4" = 1'-0" | Imperial | Most common US residential scale |
| — | Imperial | Used for larger homes or site plans |
| 1:50 | Metric | 1 cm on plan = 50 cm in reality |
| 1:100 | Metric | 1 cm on plan = 1 meter in reality |
Always use the printed scale bar over the written ratio. When a plan gets photocopied or digitally resized, the written ratio becomes inaccurate while the scale bar adjusts proportionally.
Dimension strings run parallel to walls, capped with tick marks or arrows at each end, with the measurement written above. Two types appear on most plans:
- Clear internal dimensions: Wall face to wall face, showing the space you actually live in.
- Center-to-center dimensions: Measured through the middle of walls, used by builders but not reflective of usable room size.
Room dimension labels inside the room outline are approximations. A bedroom labeled "12 x 14" gives you a useful reference, but always consult the perimeter dimension strings for precise calculations before ordering furniture or planning renovations.
Pro Tip: Carry a tape measure to any model unit or site visit and verify at least one known dimension, like a standard 3-foot door width, against the plan. If they match, the plan is reliable.
For metric plans, drop three zeros to convert millimeters to meters. A room labeled "3600 x 3300" is 3.6 meters by 3.3 meters, roughly 11'10" by 10'10".
Key considerations and common pitfalls when reviewing floor plans
Most buyers focus on room sizes and miss the things that determine whether a home actually works day to day.
- Trace circulation paths first. Walk from the front door to the kitchen carrying imaginary grocery bags. Count the turns and doors. Hallways should be at least 3 feet wide; kitchen aisles ideally 3.5 feet or more for comfortable use.
- Check door swing conflicts. Two doors that open into the same space create a daily frustration. Verify that no door arc overlaps another or blocks a key circulation route.
- Assess natural light using the north arrow. South-facing windows receive significant sunlight throughout the day, affecting both comfort and energy costs. A bedroom buried against a duct or interior wall will need artificial light all day. The north arrow guides window placement for passive solar heating and cooling.
- Identify load-bearing walls before planning renovations. Structural constraints are not always obvious from a plan, but thicker wall lines are your first signal.
- Look for dead-end corridors. Long, narrow hallways consume floor area without adding livable function. Circulation typically consumes about 10% of a home's total area, so that space should work hard.
- Check storage. Count closets and their dimensions. Buyers consistently underestimate storage needs until move-in day.
Pro Tip: Cross-reference the floor plan with a physical site visit or model unit tour before committing. Plans show geometry accurately but cannot convey ceiling height, natural light quality, or how a room actually feels when you stand in it.
Understanding how floor plans connect to broader residential property types helps you ask the right questions when comparing layouts across different building categories.
Effective strategies for visualizing spaces from floor plans
The mental walk-through is the most reliable technique for judging whether a floor plan will work for your life.
- Start at the main entrance. Picture yourself opening the front door. What do you see immediately? Is there a foyer, or do you step directly into a living area?
- Move room to room in order of daily use. Kitchen to dining to living area. Bedroom to bathroom. Trace the path you would walk every morning getting ready for work.
- Place your furniture mentally. A queen bed is roughly 5 feet by 6.7 feet. Add 2 feet on each side for access. If those dimensions do not fit inside the room's clear internal measurements, the layout will feel cramped.
- Imagine the light at different times of day. Using the north arrow, picture where morning sun enters and where afternoon heat builds. East-facing bedrooms get gentle morning light; west-facing rooms can overheat by late afternoon.
- Look for "open to below" notations. These appear on upper-floor plans where a space has no floor, opening down to a double-height area below. They affect acoustics, heating, and the sense of volume dramatically.
- Check ceiling height clues. Dashed lines near the center of a room often indicate beams or sloped ceilings. Notes like "10' AFF" tell you the ceiling height at that point.
- Flag potential issues before visiting. Mark any room where door swings conflict, where natural light seems absent, or where the circulation path forces you through a private space to reach another. Bring that list to the site visit.
For buyers exploring accessory dwelling units or secondary structures, ADU floor plan guides apply the same reading principles to smaller, more compact layouts where every square foot carries more weight.
What architectural experts want you to know about floor plans
Floor plans are precise about geometry and silent about almost everything else.
A floor plan cannot show you volume, light quality, or the emotional impact of a space. Two rooms with identical square footage can feel completely different depending on ceiling height, window placement, and proportion. Always pair the plan with a physical visit or a detailed virtual tour before drawing conclusions.
This gap between plan and reality catches buyers off guard more often than any other aspect of the homebuying process. A room that reads as generous on paper can feel tight when ceiling height drops to 8 feet, or when the single window faces a neighboring wall.
The north arrow carries more weight than most buyers realize. Orientation determines which rooms receive morning versus afternoon sun, how much passive solar heat enters in winter, and where cross-ventilation is possible. A south-facing living room in a cold climate is an asset; the same orientation in a hot, humid city may mean higher cooling costs year-round.
Load-bearing walls define what is structurally possible if you ever want to renovate. Spatial logic and structural constraints are baked into the plan from the start. Buyers who understand which walls cannot move avoid expensive surprises during remodeling.
Pro Tip: When reviewing a plan for a property you are seriously considering, sketch your actual furniture to scale on tracing paper and lay it over the plan. This takes ten minutes and reveals fit problems that hours of mental visualization can miss.
Room labels and dimensions are starting points, not final answers. A room labeled "Master Bedroom" at 12 by 14 feet sounds comfortable until you realize the door swings into the only wall where a bed fits. Read the geometry, not just the label.
How to use 3D visualization to connect floor plans with real spaces
Two-dimensional plans are abstractions. The jump from lines on paper to a lived-in room is where most buyers struggle, and 3D visualization tools close that gap directly.
Several software tools convert flat floor plans into navigable 3D models. RoomSketcher and RoomSketch3D let you upload a plan, assign room heights, and walk through the space virtually before setting foot on site. You can drop in furniture at accurate dimensions and immediately see whether a sectional sofa fits or whether the dining table blocks the kitchen entry.

BIM software like Revit and ArchiCAD, used by architects, generates floor plans automatically from a 3D model. When you receive a plan produced this way, every dimension is coordinated across all drawing types, reducing the risk of errors between what the plan shows and what gets built.
For buyers without access to professional software, a simpler approach works well. Print the floor plan at a known scale, cut out paper rectangles representing your furniture at the same scale, and arrange them on the plan. A queen bed at 1/4" = 1' scale is about 1.25 inches by 1.67 inches on paper. This analog method surfaces conflicts that are invisible when you read dimensions alone.
Virtual tours and 360-degree photography, increasingly standard with new developments, complement floor plans by showing actual light, finish quality, and spatial feel. Experts consistently recommend pairing plan analysis with these tools rather than relying on either alone.
Key Takeaways
Reading floor plans accurately requires combining symbol literacy, scale interpretation, circulation analysis, and 3D visualization to assess whether a home truly fits your life.
| Point | Details |
|---|---|
| Start with four essentials | Locate scale, north arrow, legend, and title block before analyzing any room. |
| Use the scale bar, not the ratio | Scale bars stay accurate when plans are resized; written ratios can become misleading. |
| Trace circulation paths | Hallways should be wide enough for comfortable passage; kitchen aisles should allow sufficient space for ease of use. |
| Check door swings carefully | Door arcs show the floor area swept open; ignoring them causes furniture and traffic conflicts. |
| Pair plans with site visits | Floor plans show geometry accurately but cannot convey volume, light quality, or spatial feel. |
Aurea-sgcondo offers a range of thoughtfully designed unit layouts across 2 to 5 bedrooms, plus two exclusive penthouses, at 802 Beach Road, Singapore. Each floor plan reflects deliberate decisions about circulation, natural light, and livability that become clear once you know how to read them. Explore the latest unit layouts and apply everything covered here to evaluate which configuration fits your household best.